Asterisk Project 1
Due Friday, August 7, via sakai or email.
You will each be given administrative access to your own instance of an
Ubuntu linux system running Asterisk. You can run it either on the Loyola
server (eg cs446j.cslabs.luc.edu), or you can make a copy of the virtual
disk and run it under VMware or VirtualBox on your own machine. The
department has a group license for VMware.
If you're using the departmental machine, all you have to do to turn it in
is let me know it's ready. If you're doing this on your own machine, send me
all the Asterisk *.conf files you modified; typically, this will be sip.conf
and extensions.conf. You can use ls -lt | head to list the 10
most-recently-modified files, to see if you changed anything else.
Connecting with Ekiga
Your first task is, of course, to figure out how to call
in to your Asterisk server. I recommend using a softphone such as
Ekiga (although let me know if you find something better). You will not be
asked to do any two-way communication; you will simply be creating auto-answer
extensions with voice menu systems; therefore,
for most work you won't need to be able to handle sound input. You will,
however, need to be able to record voice samples for use as system prompts.
I use the linux utility Sound Recorder; there is also a WinXP utility of the
same name under Programs => Accessories => Entertainment. I assume
either it or an improved version is available under Win7. Finally, using any
of several speech-synthesis tools would be an option.
The Asterisk servers will be configured to support a predefined SIP
connection with username ekiga and password sipsecr3t
(there are also accounts softphone1 and softphone2
with the same password). You will have to configure your softphone with
these two parameters and the name
or IP address of your Asterisk server. The softphone will then initiate the
registration process with Asterisk.
You do not need an ekiga.net account.
Ekiga is not available for the mac; mac users might consider iSoftPhone,
SJPhone, Telephone or X-Lite.
Each SIP account corresponds to one channel or extension. You might
eventually want to create multiple accounts/channels/extensions for testing
different extensions.
To add an Asterisk account, use the Accounts => Add a SIP Account option.
When creating an account for ekiga (or another softphone) your registrar
should be your Asterisk server; you may enter either the IP address or the
DNS name.
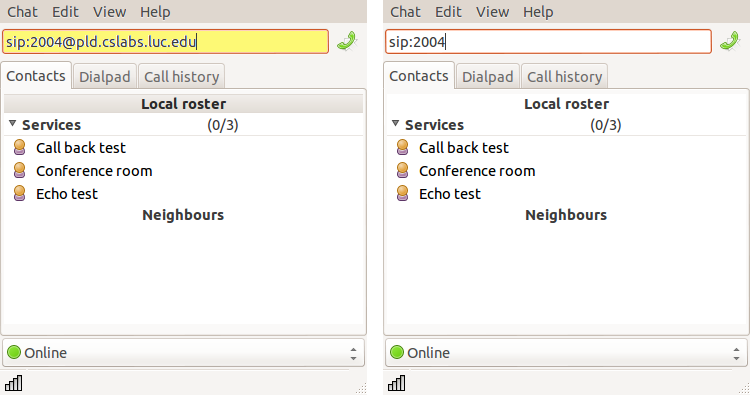
When placing a call from ekiga, you probably have to make sure the DNS name
of your Asterisk server appears in the upper box, eg sip:2005@pdordal.cslabs.luc.edu.
This is highlighted in yellow in the screenshot at left (using 2004 instead
of 2005); the "sip:2004" at the top of the righthand window is wrong.
Recent versions of ekiga appear to have moved the box to the bottom of the
window rather than the top.

Sound Files
Most sound-recording utilities save sound as 16-bit wav. It appears that
Asterisk 13 does support wav files directly. However,
if you find you need to convert that to ulaw, I
recommend using the "sox" sound-conversion program. To use sox to convert
from foo.wav to foo.ulaw, use
sox
foo.wav -r 8000 -t ul foo.ulaw
Sox will figure out things like the sampling rate of foo.wav (the -r
8000 is for the sampling rate of the ulaw file) and whether it is
16-bit, etc.
You may also need to ensure there is only one channel in
your sound file. Normally low-end sound-recording utilities do create
single-channel files by default (you really need at least two microphones to
make a dual-channel file!), but otherwise I believe the sox option to force
a single channel is -c 1.
The Project Itself
You are to take the final (magic-number) example in the Asterisk
Config notes and modify it to support the following features. The
features are roughly in increasing order of complexity. The existing source
is in extensions.conf in the [dbdemo] context (section); all your changes
should be confined to this context, and perhaps one additional context
[initdbdemo] (see below). The extension to reach this is 2005.
0. Currently the server reads you your magic number whenever you log
in press "1". Change this so the magic number is read to you only
- when you request it by pressing 2
- just after you enter a new magic number, for confirmation (optional)
1. Implement a passcode system.
Before you can get access to your magic number, let alone set it, you have
to provide your passcode. Of course, the account has to be entered first, so
that the system knows which passcode to work with. Passcodes should be set
up initially in the Asterisk database system (and should probably initially
be the same as the extension). You'll use a separate database subtree from
the magic-number table; see the database information below.
Some accounts may not have passcodes; your system should handle that option
by allowing authenticated access.
Note that a "finished" version here implies some structural changes to the
prompt system: you should authenticate first
(account number and then passcode), and only then be allowed to reach a menu
where you can set and get the magic number. My existing menu allows you to
set your account at any point.
While you are doing this, you should also adjust the prompt system to better
make a distinction between accounts that have a magic number already (in
which case it is read), or accounts which do not yet have magic. Create
different prompts, eg
- Press 1 to change your account, 2 to get your magic number, and 3 to
set your magic number
- You have no magic number. Press 1 to change your account and 3 to set
your magic number
You should handle the passcode in a separate context, eg
[initdbdemo]. The goto() in the extension 2004 link should now take you to
this context; the [dbdemo] context is to be reserved for authenticated
access.
[initdbdemo]
start: your account is ....
press 1 to log in to this account, 2
to change accounts
1: enter your passcode: ....
....
goto(dbdemo, start,
1) ;; logged in ok
2: enter your account number: ....
[dbdemo] ;; only here if logged in;
account is
start: press 1 to get your magic number, 2 to set your
magic number, or 3 to change your account
1: (more or less as before)
2: (more or less as before)
3: (more or less as before)
2. Add support for allowing a user to change
his or her passcode. It is common, though not universal, practice to require
re-entry of the old passcode at this point.
3. Add support to allow the user to change
to a new account (with new passcode) without hanging up. This can
be done either with a special option in the main menu to "start over", or
with a fourth option in the [dbdemo] context. Either way, it should take the
user back to the start of the [initdbdemo] context. You can either ask for
the new account number before going to the new context (allowing a
slightly smoother transition), or after.
4. Currently the initial default account is 2000, based on the
theAccount=2000 line in extensions.conf:
[globals]
theAccount=2000
Have the initial default account instead be the user's extension, using
caller-ID to get the extension, if this caller-ID information is
available. Design this option so it is quick and easy to use. If the
caller-ID information is not available, use no initial account (or 2000, if
you can't get the no-initial-account thing to work). Note that the most
common arrangement in Asterisk is for the extension caller-ID number to be
set in the sip.conf file, as part of the definition of a given channel. Use
substring operators to get the last four digits of the caller-ID number; eg
${CALLERID(num):-4}. See asterisk_config.html#substring
for more information.
5. Try to organize the whole system so that it sounds like a "real"
auto-attendant system, with clear prompts for selections and entries.
All voice prompts should spell out all options; there should be no "hidden"
options. That said, you don't have to be wordy; you can just say things like
"one for setting account; two for passcode, three for magic". Use the
built-in recordings by Allison Smith as appropriate, or make your own.
Appropriate initial entries in the database should be made from the Asterisk
command line, which you reach from the bash command line with asterisk
-r. Handy commands:
- database show
- database show dbdemo (only shows the dbdemo subtree of the database)
- database put table key value (eg database put dbdemo 4001
123454321)
- database get table key
- database del table key.
You can create new "subtrees" dynamically (you will probably need this to
create initial passwords).
I believe I have now created the following entries in the dbdemo database
"subtree":
account
|
magic
|
4001
|
123454321
|
4002
|
429811
|
4003
|
37
|
| 4004 |
59 |
Here is a link to the original extensions.conf,
in case edit yours extensively and decide you need to start over.
Documentation
An early edition of the book Asterisk: The Definitive Guide is on sakai. You
will need only a little of it:
- extension scripting
- variables
- subroutines
- AstDB (Asterisk Database). All tables have only two attributes:
⟨key,value⟩. Thus, you will need two databases, eg MagicDB and
PasswordDB, with both using the account number as the key.
Most if not all of the information you will need is in Chapter 10: Deeper
Into the Dialplan of The Definitive Guide; there is also some more basic
information in Chapter 6. The GotoIf() function is documented in Chapter 10,
as is the Asterisk Database. You should not need
subroutines or macros.
If you look at the existing extension 2005, there is a line
exten => 2005,1,Goto(dbdemo,start,1)
This means that if you dial 2005 you go to the start
extension in context [dbdemo], which begins further up.
Any digits you press other than as read by the Read() command will
be interpreted as "extensions" in this context. If you look at the [dbdemo]
context, an extension of "1" tells you the account, an extension of "2"
tells you the magic, and an extension of "3" sets the magic.
To reach the Asterisk command line, type the command asterisk
-r as root. Use ^D or exit
to exit. To reload extensions.conf, go to the asterisk command line and type
dialplan reload; note that it is not "extensions reload". To reload any
changes to sip.conf, use sip reload.
Working on your server
Whether you use your own virtual machine or the Loyola virtual machines, you
will log in as account "telecom" and the password you were emailed. You
should then become the "root" user with sudo
bash. The Asterisk files are in /etc/asterisk.
To connect to the server, one option is to use the Windows Remote
Desktop (it's in the Loyola software distribution, but I had to
search for "remote desktop"). All the telecom servers are now running xRDP.
You can specify the window size when you log in (under the Display
tab), and you should plan on using at least a 600x800 screen size. You
should probably not, however, use the maximum window size. The window size
must be set in Remote Desktop before connecting. You will log in
as user "telecom", using your assigned password.
When you first connect, you get a gray screen and one simple terminal
window. It now seems like the xfce4 window manager starts up automatically;
if it does not, type the following command in the terminal window:
startxfce4
and everything should look much better. (There is no space in the command
above.) (If startxfce4 doesn't work, contact me.)
If you don't get a terminal window, and can't open one by right-clicking and
scrolling down to "Terminal", start over and specify "xterm" in the Programs
tab.
At this point you should have a GUI desktop to your server.
From home, you will need to do this through the Loyola VPN, though the new
LPA version was introduced in July 2012. Once you log into the VPN, you
should be able to contact your server at its designated IP address. (Note:
we had a problem with this on 7/28; I'm still waiting to hear back from ITS
whether the VPN will work.)
For some operations (in particular for connecting to the Asterisk console,
but possibly also for moving image files), you will need to be the
superuser, or root. You become root with the command sudo
bash, which will prompt you for your password. For this
particular application, I recommend executing most commands as root.
However, the initial RDC login should be as user "telecom".
If you upload a sound file to your server, you may need to copy it to the
correct location (asterisk/sounds/en). Uploads themselves can be done with sftp;
eg using FileZilla.
To access the Asterisk command line (eg to reload, or to watch messages),
you will need to be root. Do this from your root window,
above, with "sudo asterisk -r".
To edit files, the simplest editor is gedit, which you can
start from your regular-account window as
gedit
extensions.conf &
If you are interested in installing your Asterisk server locally, under
VMware or VirtualBox, let me know and I will supply the files (one of which,
the virtual-disk image, will be about 4 GB). This too will give you access
to the full graphical-user interface. Log in as user telecom,
and create one terminal window with root privileges. You may wish to install
the "guest additions" package appropriate for your virtual machine; if not,
you'll have to use a special key option to "release" the mouse from the
virtual machine. For VirtualBox users it's usually the right
Ctrl key; for VMware users it's Ctrl-Alt.
If you forget this, you can't get your mouse free from the virtual machine!
If you are working on the Loyola-hosted servers, you can if you prefer use
the command-line interface using ssh. You may wish to enable ssh public-key
authentication, so you can (a) log in more easily and (b) log in at all from
outside Loyola. You will likely still need the Loyola VPN, however.